


Understand Your Battery Monitor While Charging
If you don’t have a battery monitor on your boat, we highly recommend having one installed. It’s similar to a fuel gauge and speedometer for your house batteries and it really takes the guesswork out of managing your energy consumption. We have written a number of articles on how battery monitors work but we recently received a request from a boater to interpret his battery monitor while the batteries are being charged from three different sources, the generator, the alternator and shore power.
Let’s start with the four pieces of information you commonly see on any battery monitor:
V = Volts. Voltage is used to assess the approximate state-of-charge and to check for proper charging. For example, an at-rest, fully charged 12V battery bank will show about 12.6V to 12.8V. A 12V battery is 100% discharged when it reaches 10.5V. A 12V battery is 50% discharged at 12.2V assuming there are practically no loads on the battery. When charging, you are looking for an increase in voltage. For instance, if your batteries were at 12.1V before charging, you will want to see that number increase. It’s hard to predict where the voltage will rise, as it depends on the size of your battery bank and the charge rate. A good analogy is topping off a pool with water, how quickly it takes for the water level to reach full, depends on the combination of the hose filling the pool and the size of the pool. Imagine a battery bank at 11.9V, a 100A alternator will get 2 golf cart batteries to 14.4V in little time, conversely a 55A alternator will take hours to get 8 golf carts batteries to 14.4V.
A = Amps. Amps is the flow of current in or out of the battery. Current is analogous to speed, it’s the rate at which electricity is flowing. While driving a boat, you would say I’m doing 10 knots, and you would cover 10 NM if you travelled for one hour. Amps are similar to boat speed. For example, I am drawing 10 amps and, if the current was constant for one hour, you would say I used 10 amp-hours (more info on amp-hours below). Your fridge may draw 6 amps of current and this is displayed as -6.0A. Discharge is shown as a negative number and shows the number of amps that are being consumed. This is an important function to teach your crew as it serves as a good reminder to turn off unused lights, navigation equipment, etc. If you had no loads on your batteries, any charge going into the batteries (e.g. solar, alternator, charger, etc) would show up as a positive number.
Ah = Amp-Hours. This shows the amount of energy stored or removed from the battery. If you run a 10A load for one hour then 10Ah are consumed. The battery monitor will show -10 in the Ah display. During charging, the battery monitor will compensate for charging efficiency and count back up toward zero. A full battery is displayed as zero amp-hours or 0Ah. Any draw from the battery is reflected as negative amp-hours or – 0.4Ah and recharging will bring the number back to 0Ah.
h or t = Time. This is an estimate of how long (in hours) the battery will sustain a load, assuming the load is constant over time. It is on a selectable, time averaged, rate of discharge. The default on most monitors is the average of the last four minutes of use. This would only be useful if the loads on your boat where constant and did not fluctuate. A good example of this is predicting the distance you will travel in one hour if you are driving on the highway or in the city. On the highway, assuming little traffic, your speed is 100 km/h and you will travel 100 km in one hour. But in the city, your speed fluctuates constantly and it’s hard to know the distance you will cover by knowing the speed you are going over the last 4 minutes. It’s for this reason that we don’t encourage boat owners to pay attention to time predications.
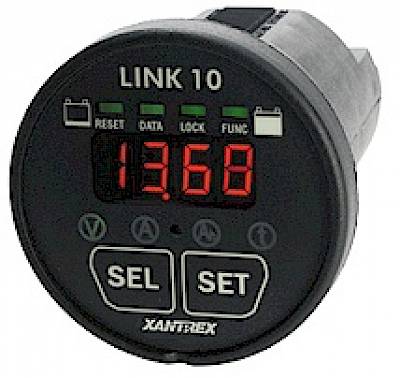
Set Your Battery Capacity. When you install your battery monitor, it is important to remember to set your battery capacity. Many battery monitors are preset, for example, the Xantrex Link 10 assumes you have 200 amp-hour, lead acid batteries. Your actual battery capacity and type will, most likely, be different so you must change these settings for the battery monitor to give you an exact reading.
Location of the Shunt. The other important installation tip is the location of the shunt. Ensure that there are no loads (e.g. diesel heater or bilge pumps) or charging (e.g. solar panels or EFOY) connected directly to the batteries as these will bypass the shunt and will not be seen by the battery monitor. This is the biggest mistake we see in battery monitor installations.

Now let’s take a look at our example. This boater’s house bank has 6 golf cart, flooded lead acid batteries for a total of 660Ah of battery capacity. There is a 6.5Kw generator, a 2500W inverter/charger and two 12V stock 55A alternators with internal regulators. We are going to look at the battery monitor readings in four scenarios:
-
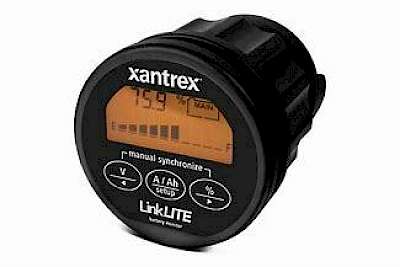
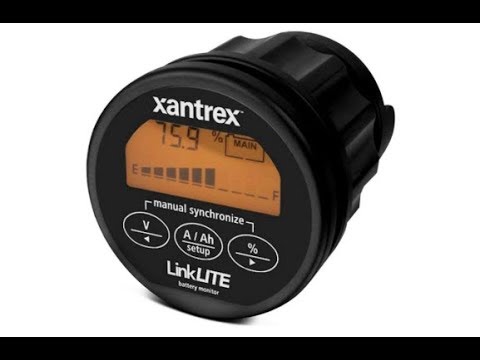
Getting ready to leave for the weekend, plugged into shore power. This photo shows that the batteries are currently being charged at 13.55 volts (the battery charger is in float mode). There is a draw on the batteries of -0.4 amps, the values will hover near zero as the charger reacts to loads being turned on or off the battery. The batteries are topped off with a 0.12AH charge. This means the battery bank it full. Time shows that the batteries are not being drained as the charging is offsetting the loads.
-
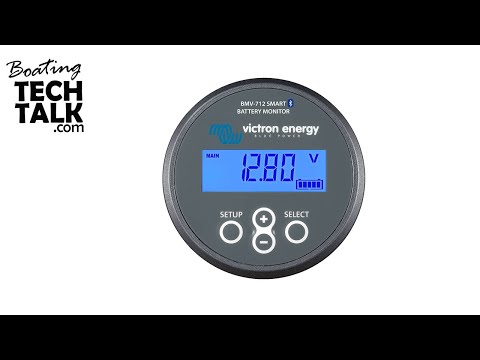
At anchor, running the generator, 9:00 a.m. The batteries are currently being charged at 13.80V, the batteries are being bulk charged via the inverter/charger which is powered via AC, at 121A (positive), the batteries are down -219Ah and under time it shows that the batteries are charging. Remember the genset recharges the batteries by providing AC to the inverter/charger, which in turn the charger function converts AC to DC for the batteries.
- At anchor, running the generator, 9:45 a.m. The batteries are currently being charged at 14.0V, the batteries are being charged at 079A (positive), the batteries are down -138Ah and under time it shows that the batteries are charging. Interesting point here is that the charger is temperature compensated and the charger is now in absorption mode. We know this because the amps on the charger have come down from the maximum output and the voltage has reached its maximum target of 14.1 V (temperature compensated with a lower voltage for a warmer battery).
- Getting ready to head home, motoring at 8 knots with two stock 55 alternators. The batteries are currently being charged at 13.25V, the batteries are being charged at 21.4A, the batteries are down -128Ah and under time it shows that the batteries are charging.
| V | A | Ah | h or t | |
|---|---|---|---|---|
| 1. | 13.55 | -0.04 | 0.12 | CCC |
| 2. | 13.80 | 121 | -219 | CCC |
| 3. | 14.0 | 079 | -138 | CCC |
| 4. | 13.25 | 21.4 | -128 | CCC |
A side note on alternator size and charge. The amperage rating of an alternator is quite misleading. For instance, let’s look at a stock 55 amp alternator. First the default amperage rating of the alternator only applies when the alternator is cold, once the alternator is warm from running you can de-rate the alternator output by 10-15%. A stock alternator has an internal regulator and the alternator should be de-rated by another two-thirds. Factoring the realistic output when the alternator is warm and also the internal regulator, the alternator outputs about 30 – 35 amps. This alternator output is further de-rated depending on the RPM of the engine. Stock alternators reach their maximum output at or near maximum RPM. For instance, running a diesel at 1600 RPM or 2300 RPM will change the alternator output.
Back to alternator charging, running a planing hull at lower RPM will seriously lower the alternator output. Furthermore, when running an engine, you will also have more loads running than while at anchor, for instance your navigation system or perhaps engine room blowers, this will take some of the alternator output and so the resulting net charge into your batteries will be commonly lower then when running the generator at anchor.
Battery monitors come in many shapes and sizes but the symbols are constant. If you can’t remember how or when your battery monitor was installed, it might be a good time to pull out the manual and double-check the settings for your battery capacity.
About the author: Jeff Cote is the owner of Pacific Yacht Systems, a full service shop delivering marine electrical and navigation solutions for recreational boats. Visit their website and blog for info and articles on marine electrical systems, projects and more: www.pysystems.ca.
 $399.92
 $292.85


Related Content


![]()
Copyright © 2024 Pacific Yacht Systems.