

How To Install Heat Shrink Terminals on Boat Wiring
Transcript is auto-generated.
hey guys it's jake with building tech
talk
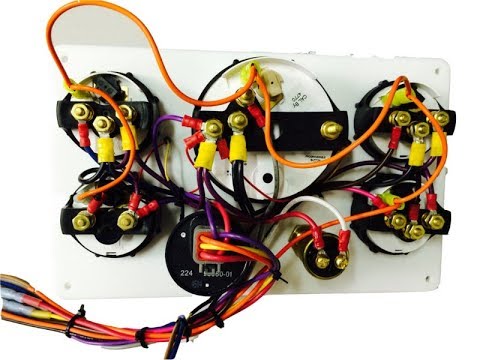
today we're going to go over heat shrink
connectors and terminating them to a
fuse block
from a solar charge controller you can
see we have our
solar wires coming in from our array and
then our cables coming out
to our fuse block we've already got them
kind of where they should be which is
nice you always want to see a little bit
of extra length there
which means number one if there's other
cables and you're strapping to it to try
and keep it
nice and neat you have room to do that
and if you mess one up you've got
tons of room that you can cut it back
further and
still have room to connect it to the
terminal so we'll start with
the positive down here always try and
remember as well to line up on a fuse
block like this
we have our one two three on this side
if we're going to do the bottom one here
for our positive
i'd also choose the bottom one here for
the negatives so tracing cables later
also is easier
you can see there it's a little bit long
we're going to leave it and we're going
to strip it
what i like to do is hold the terminal
that we're
connecting it to up to it so you can see
how long
you need to strip the cable so for that
we're going to say it's about a quarter
inch
we're going to take our cutters
and carefully strip the jacket from
the wire and what you're looking for is
all of the strands to stay nice and
intact and straight
so that when we slide our connector on
we don't have any sticking out
as we slide it in keeping all of the
strands
nice and neat you should be able to see
there that the wire is sticking just at
the end
which shows that you've got nice even
cable coming through and it's going to
terminate nicely
we're going to use these crimpers
these are a nice pair because they have
crimping tool here and also cutter tools
so if you're
looking to save space on your board or
something like that you can always just
keep
a pair of these handy we use
this center crimp here not this other
one as that would
as it pinches down actually pierce
the jacket of the heat shrink which we
don't want to do
so we're going to use this here i'm
going to come on
nice and center of the heat shrink
connector and crimp it down
as this is a bigger gauge 10 wire with
this
i like to take both hands and really
just make sure that it's crimped on
there tight
and then release you have a nice flat
crimp there you can see it crimped down
it didn't pierce the heat shrink
connector jacket and i can pull on it
fairly hard and it's definitely not
going anywhere
the next step for that one would be it
looks good make sure it lines up nicely
with our terminal
and then we're going to heat shrink it
for this
as it's small electronics wiring i'd
usually use
just a butane torch so we can turn this
on
i like to keep these on a lower setting
when doing the heat shrink connectors
if it's too high i often find that it
burns the edge of the jacket and we can
show you that next
just keeping nice even heat
over the heat shrink portion
there we go
so you can see that the wire comes all
the way through it's crimped nice and
flat and now the heat shrink has made
good adhesion to the jacket of the wire
itself
and there's actually glue coming out of
the heat shrink there so that one would
be
ready to terminate here which we can
show you
good thing to remember is to always
check
your rings as you
terminate them the amount of times that
i've
thought that i had the right sized ring
and then gone to connect it and it's
either too large or too small
is you couldn't count it
so just always double check take the
screw out
feed it through the same with even the
bigger bus bars
they're usually 5 16 or 3 8 but it's
nice to just always be able to check and
know
this is the one that's going on there so
then for our negative
what i'll do is i'll actually show you
an incorrect way that you could do this
which would be either
too much insulation being stripped from
the wire or too little
so we can go through both of those it's
always good to practice like you'll
never get it right the first time
if you're not doing it all the time so
practicing
is always great for these time types of
terminations
so this one we're going to strip it too
long we checked with the other one
and we said it was about a quarter inch
this one we're going to go more like
a full inch
a little bit over exaggeration but
that's okay
so again nice strands of wire sticking
up straight and unbent
then you'll see as we slide this on
because there's more
room for it to fray out like this it's
actually harder to slide the connector
on
which can be an indication that maybe
you've got too much
stripped off so you can see i can't even
actually get that
on there nicely and there's strands
twisted up inside the jacket they're
sticking back
out of the insulation and there's
actually bare wire
outside of the heat shrink so if i was
to crimp this on would actually see
that it wasn't covering the jacket
nicely like this one down here
so we'll take that one off we'll
re-measure it
so you cut it about there
you can see now it's cut too short
so if i try and feed it on there now
it's going to feed in nicely
but straight away we just hit the jacket
part of the cable
and as we twist it over we don't see
the copper wire coming outside of this
connector here which is not good it
means it's not making good connection
it's better to have more wire
through there for better connectivity
otherwise over time
poor connectivity can cause issues with
arcing
corrosion everything so we're going to
strip it back to the size it needs to be
like that twist it nicely
feed on our connector it's pushed all
the way out
to the jacket
you can see the cable coming at the end
here the wire coming at the end and
we're going to crimp it
this time we're going to use these
crimpers a bit more of a mechanical tool
i like these more as an everyday use
as you're getting a bit more purchase on
each one and you know
that as you come all the way down
and you hear it click you've crimped it
to exactly what it needs to be
so we're using the yellow heat shrink
connectors we're using the yellow
terminals of these
crimpers it can be hard managing these
tools in your hands so if you're
left-handed or if you're right-handed
i generally will hold
full in my palm like this two fingers to
bring it forward and as i get in
it's making a fist so that you can fully
squeeze that down
and get the termination that you need
so we're going to come on here and
squeeze down a little bit
similar to the other ones right now like
my grip strength isn't enough to close
on that
um so both hands to fully crimp that
down
and release and again you can see nice
flat crimp there
all the way through and good termination
so we could heat shrink that one down
and connect it to our fuse block
so here two coming a little bit close
with the torch
we can see there's a little bit of
charring happening it bubbles in the
plastic of the heat shrink
which causes it to be not as effective
as it could be some of the resin that's
inside starts to leak out
and that's not what we want to see so in
this case i would actually
re-terminate this remove that
take my new heat shrink connector
measure again
restrip it keep wires nice and neat
into the connector make sure i see my
wires sticking out the end of the
connector
take my crimps holding it nice and tight
down against the jacket to make sure
it's fully in
crimp release
and there we go heat that one down
this time we're going to keep the butane
torch a little further away
it's okay to go around a couple times to
try and heat it evenly if you're not
heating it evenly
especially on some of the bigger gauge
wires you can actually end up with
bubbles
inside of the heat shrink so you can see
with that one there
we don't have any charring no bubbling
we didn't see any smoke
that's perfect and ready to terminate
this can be difficult too lining these
up so
sitting it down and putting it in if
it's up on a wall
or underneath your dash or something
like that it's a little bit tricky i
like to feed the screw through so that
it's in there
nicely and then find my termination
point
and screw it
make down it's nice and tight and you
shouldn't be able to move these side to
side
they should be in there nicely coming
out nice and straight
just like that
cover back on
ready thank you for watching this pys
video if you've got further questions
please
ask them below or send us an email via
the contact forms on our website
and don't forget to subscribe
thanks again for watching
English (auto-generated)
 $258.00
 $181.33


Related Content


![]()
Copyright © 2025 Pacific Yacht Systems.