


Sunken Gems
The first rule of boating is to ‘keep the water on the outside.’ Occasionally we are faced with the task of refitting the electrical system on a boat that has been submerged in water. The following are just some thoughts to keep in mind before and during the process. Refitting a boat is like creating art, it’s not for everyone and it’s easier for some than others.
Lesson One: Prep The best way to start overhauling a ruined electrical system is with as much of a blank canvas as possible. Removing all of the damaged components makes eliminating the signs of sea water damage much easier and the final result will be a lot better. If you wish to sell the boat, this will certainly make a big difference. Also, when everything is out installing the new gear is a little more straightforward and causes less hassle and delays for the work ahead. This includes any doors, wall panels, headliners and void space hatches, and so on. You will face enough challenges as it is, so a little prep work goes a long way.
Lesson Two: Assess the Level of Damage Before parts and materials are ordered, you must access the total damage of all electrical items and components on board. Always keep in mind that just because a component didn’t go under water, doesn’t mean it hasn’t been affected. For example, if your main switchboard was submerged and it feeds components that function above the damage waterline, the cabling and the component may have suffered damage.
Each cable needs to be tested. You should not make the assumption that the cable on the boat is OK by cutting the ends back and sampling one out of the three cable runs. Unfortunately, when it comes to electrical, being 99 percent right is not good enough. Since even that one percent has the potential to cause serious damage to the electrical equipment or even cause a fire.
On a recent electrical refit of a Nordhavn 75 EYF that was submerged to the saloon headlining, we discovered that some cables had suffered differently than others in the same run. For example, a bunch of lighting control wires that were bundled together had different amounts of water damage. Even though they were going to the same bank of light switches and ran the same distance above the damage line. Some had only absorbed a few inches of water and others showed signs of water many feet up and past the waterline into the saloon roof to the termination point. All connected at both ends in the same manor and all started at the same point below the waterline. Some just were affected differently.
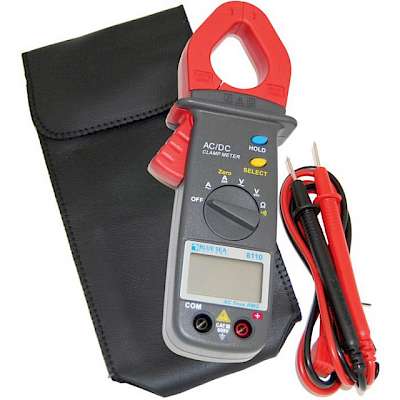
Tip #1 Your safest bet is to test all cables by using an insulation resistance tester, which can be found at most electrical wholesalers.
Tip #2 Another test is to cut the end of the cable and check for discolouration of the copper. If it is anything but shiny silver or copper (depending on what the manufacture used) it has suffered damage.
Tip #3 One of the quickest and simplest ways to check for damage inside the cable is by bending it back and forth. Cable that has been in water will give a sound similar to crunching paper. This can be done along the cable to find how far the water went up the cable.
Now if you know you have enough extra length before the cable connection point you can keep cutting back until the cable appears new. Do the same at both ends and recheck with an insulation resistance tester. Anything less than 0.5 ohms is acceptable. Only join cables if you absolutely must, a good rule of thumb is “If in doubt, throw it out.”
On a Tiara 35 that suffered complete submersion at the dock, not all the electrical was replaced by the original owner. Over time the new owner complained that is fridge/freezer was working intermittingly. Upon inspection we noticed that wiring to the fridge would lose some two to three volts under load due to corrosion. Enough voltage drop that the fridge would not work under battery power but would run under battery charger.
Lesson 3: Match or Improve the Original Quality One of the major decisions when refitting any boat is do you put the boat back as it was or do you add to the systems? To keep the value of the vessel, she must be put back as she was at a minimum. Systems and components can be upgraded to suit your personal needs. If your engine room and/or lazarette was submerged, many of the vessel’s systems are in these areas.
For example, if your battery bank/s were under water for any period of time, they should get replaced and this provides a great opportunity to re-design and upgrade your systems. For instance you might choose to add more battery capacity to your house bank so you can anchor for longer. Obviously cost comes into play, but it is worth the thought. On a recent refit of a Meridian 459, the client decided to swap the one and two 8D battery setup to an engine and house bank composed of six L16 AGM batteries. This gave the client almost 1,200 amp hours and the ability to anchor without constantly running the generator.
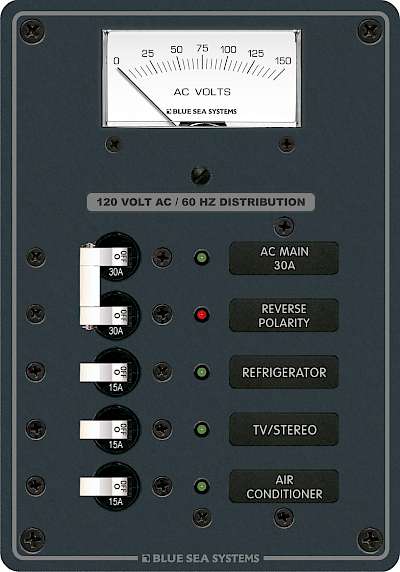
When it comes to pumps, some can be rebuilt and some can’t. They are not something that you would upgrade as they are installed to your vessel’s specifications. Items like air-conditioning, fridge or freezer compressors, can often be overhauled to save the cost of replacing the entire unit. Things to check are the control boxes and wiring. They are not designed to be in water so they have to be tested and replaced if damaged. On a Grand Banks 42 that suffered water damage, we were able to spare the switchboards made from plastic. However, the circuit breakers are never meant to get wet and had to be replaced.
Tip #4 A few good things to keep in mind when reinstalling the new components and wiring is that the cable routes can be altered to shorten runs, saving power and money.
Tip #5 New connections should be sealed especially if they are in wet areas, and items can be mounted in different locations to suit your own preferences. For example, if the battery chargers are hidden away making it difficult to read the front displays, you can move them to a more convenient location. Also, look at separating your wires from the plumbing. Fuel and hydraulic pipes and cables should have their own route (when possible).
Tip #6 Try to separate high voltage from low voltage cables, this will help reduce electrical interference on all audio, visual and sensitive electronics equipment.
It is a challenge to refit a boat that has sustained damage from water, be it a partial or complete sinking. Tackle the project with diligence, working methodically from one stage to another. The end result will bring much satisfaction and help maintain the quality of boat. Remember that it is a boat and the work is always ongoing: it’s a journey.
Re-fitting a Nordhavn 75
Two years ago, in a popular fishing town in Mexico, the operational life of a Nordhavn 75 came to a sudden end after some poor workmanship caused a failure in a pipe join. This join was downstream from an open seacock, and the boat sank over night at its berth. It was found the next day with a new water line sitting just below the salon headliners. A few days later she was raised and not long after that she was sold to her new owner. The new owner approached PYS and asked if we could assist in the vessel’s electrical restoration. We agreed.The refit was to take place in La Paz, Mexico, and a team was put together of various trades and nationalities. Tackling a task like this is challenging enough in Canada or the U.S. but doing it in Mexico brought forward a number of extra obstacles. Probably the biggest and most time consuming task was the ordering, purchasing and delivering of parts. We changed what we could with parts from North America to make life easier.
An assessment of what could be rebuilt and what was condemned was made prior to ordering parts. Doing this helps save money since we didn’t just go buy one of everything, only to later find out that we could have fixed the part with a service kit. We knew there was a lot of work ahead and the hours had to be put in if the job was going to be finished before Christmas. We managed to do our first sea trial at the six month mark. Everyone was happy and excited to see the girl under her own power.
A lot of items needed to be replaced and one of the major components was the wiring. No one knew at first how badly the water had damaged the cabling. So by cutting the ends of each cable one by one and testing, we found the water had travelled further then we first though. In one case it had travelled 25 feet up a cable when only 10 feet of it was under water.
The Nordhavn 75 is a lot of boat and it has many components that keep it in a class of its own. The refit was a challenging task and not one to be taken lightly. It took time, a great team of workers, constant dedication, attention and of course a few toonies. When all was said and done with successful sea trials, the feeling of accomplishing a task like this on a boat of this calibre in a country like Mexico was amazing.
About the author: Jeff Cote is the owner of Pacific Yacht Systems, a full service shop delivering marine electrical and navigation solutions for recreational boats. Visit their website and blog for info and articles on marine electrical systems, projects and more: www.pysystems.ca.

 $399.99
 $292.75


Related Content


![]()
Copyright © 2024 Pacific Yacht Systems.